Strong glutes – do they make a difference?

BOSIC sports medicine

By Physiotherapist, Vanessa Boon

The Benefits of Strong Glutes


Your gluteals are the largest and strongest muscles in your body. They are made up of the 3 muscles: gluteus maximus (glute max), gluteus medius (glute med), gluteus minimus (glute min). 


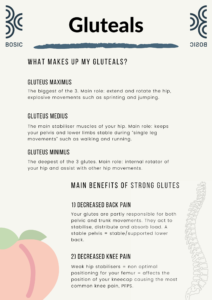
Your glute max, as the name suggests, is the biggest of the 3. Its main role is not only to extend and rotate the hip but also to drive explosive movements like sprinting and jumping (it is also the muscle that gives your bum its shape)


Your glute med is one of the muscles you would hear your physiotherapist harp on about. It is the main stabiliser muscle of your hip. This muscle keeps your pelvis and lower limbs stable during “single-leg movements” such as walking and running.


Your glute min is the deepest of the 3 glutes. It is the main internal rotator of your hip and also helps with other movements such as abduction. 


As a whole, they work to optimise proper hip and lower limb function along with stabilsing your pelvis. Besides that, here are 2 main benefits that come along with strengthening your glutes!
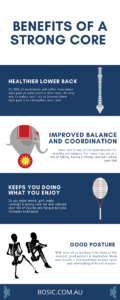
Decreased back pain

Your glutes are partly responsible for both pelvic and trunk movements. They act to stabilise, distribute and absorb load. A stable pelvis = stable/supported lower back. With load, your glutes help to distribute load to your lower limbs and absorb any excess through your lower back.

Decreased knee pain

This is mainly because your glutes keep your pelvis stable. Unstable pelvis = increased load to knees. Besides that, to be more specific, weak hip stabilisers (glute med) can cause non-optimal positioning for your femur which affects the position of your kneecap. This can cause the most common form of knee pain, known as PFPS (patellofemoral pain syndrome).

Conclusion

Whether you are trying to get that Kim K look, get more explosive power in your runs/jumps, or prevent back and knee pain, strengthening your glutes can be as easy as adding squats/bridges/lunges into your exercise routine.  When exercising the lower body, be more specific with which muscle you are trying to target. Whatever your goal, we can help you with that! To find out more about how we can help, give us a call at 8599 9811 or book in here to talk to one of our physiotherapists, and let’s get started towards your goals! 

How to Deepen Your Squat – Part 1

BOSIC sports medicine

How to deepen your squat  –  Ankle Series, Part 1 


If you’re like me and find it hard to perform deep squats or go as low as you would like, whether it be for Olympic lifting, powerlifting, running and cutting, or to jump higher, then I have a few tips for you to implement in your program. My ankle mobility tips vary from a few quick and simple wins to long-lasting effects. 

The first key area I would explore is the ankle region and its mobility. This is a common problem encountered by many athletes including myself. 

The deeper you squat the more knee range of motion is required as your knee travels forward. Mobility in your ankle joint allows your knees to travel forward and over your toes. Thus, ankle mobility is important and could be a limiting factor. 

If you have noticed your heels lifting or wanting to lift off the ground the lower you squat, then an ankle mobility limitation is most likely your problem. 

A quick test to know if your calves are tight and limiting your ankle mobility is a knee to wall test. This test aims to test your calf and ankle flexibility. The general aim is to achieve greater than 10-12cm away from the wall. 

Testing Mobility: 

  • Stand facing a wall
  • Place a ruler or measuring tape on the ground
  • Place one leg forward and one leg back
  • Keeping your feet flat on the ground push your knees forwards and over your toes to touch the wall. Ensuring your hips are facing forwards.
  • If you’re able to do this easily, move your foot away from the wall 1-2cm and repeat trying to touch the knee to the wall
  • Repeat until you’re unable to touch the wall with your knee.
  • Record the maximum distance you are able to achieve without raising your heel, knee caving inwards (ideally only travelling forward) or a pinch/excessive stretch in the calves.
  • Repeat on the other leg

Aim:  > 10-12cm from the wall


If you are standing 10-12cm away from the wall and you can’t touch your knees to the wall then you have less than ideal calf and ankle mobility. This would be a target area to optimise and deepen your squat. 

To target the calves, you can stretch them before your squat session. However, it won’t be enough because you need to stretch them under load frequently and consistently to hit your ideal squat depth. You can use a trigger point ball or simply stretch them underload. Personally, I find stretching underload more useful. 


If you have been doing that with little or no change, then perhaps trying an ankle mobilisation technique to allow the ankle joint to glide smoothly forwards and backward will have a better effect. 


Final step:

Practice, practice, practice, and practice consistently. Here is a drill I use to hone in on my ankle mobility which will transfer to my squats.


Conclusion

Remember: Consistency is key! If that has helped you and your squats. Stay tuned for Part 2 where we will discuss the importance of hip mobility. If you have additional questions, give us a call at 8599 9811 to speak with one of our physios. 

Training When Injured

resources BOSIC

I am injured. What should I do?

If you have or had an injury in the past, you may have been wondering how much training you should be doing without aggravating your injury. 

The general rule of thumb I recommend is a strategic and progressive loading. In simple terms, avoiding sharp increases in frequency, volume or intensity. I have learned this both from my clinical experience and the work of Adam Meakins, a fellow physiotherapist in the UK. Adam has simplified two common behaviours of an injury athlete: avoiders and endurers. 

  • Avoiders: the athletes who avoid and do NOT enough during an injury

  • Endurers: the athletes who endure the pain and do TOO much during an injury

After sustaining an injury it is important to rest and modify. During this ‘rest’ time I would recommend keeping the frequency of training the same or the number of training sessions per week the same. However, reducing the volume (total reps and sets) and intensity (physical and mental effort) of the workouts. What this means is that you can still enjoy training and the benefit of training without imposing more risk on the current injury. 

For the Avoiders: The purpose of keeping your training frequency the same or similar, whilst reducing your total volume and intensity is to safely train whilst obtaining all the exercise benefits. Some of these benefits are muscle hypertrophy, improving your mood, boosting your immune system, and increasing cardiovascular fitness. Once you are able to commence full training at least it won’t be a shock to the system.

For the Endurers: Less is more. Less is sometimes better. What I mean is less in regards to volume and intensity. This is termed modified training. This allows you to rest to allow the injury to recover. No one goes to work 5 days a week without sleep. Sleep is rest. Your body (injury) needs rest too. 

Takeaways

The key takeaway is to continue training whilst supporting your recovery journey. The aim is to reduce sharp increases in training load to return to the field, court, track or gym. However, respecting the body’s need for rest and recovery is of the utmost importance. If you draw yourself closer to the middle of this spectrum during training with an injury you would gain a good outcome and function. 

Please speak to a health professional. This is a guide as an injury varies amongst individuals and depends upon many factors (training history, previous injuries, stress levels, weather and many more). You can book in for a telehealth session with one of our physios online or call to book in at 8599 9811. 


Your Core and Its Benefits 

BOSIC about us

By Physiotherapist, Vanessa Boon

Do More With a Strong Core

Did you know that in most activities, your core muscles activate prior to movement? Also, a weak core is one of the main causes of lower back pain/injuries. Besides back issues, a weak core can play a part in other injuries. For example, most exercises work your core as a secondary muscle e.g squats, overhead press, and deadlifts. Having a weak core will affect your form and increase your risk of injury.

Think about it this way, your core is your foundation. You need a strong foundation before you build anything on top of it. The stronger your foundation, the bigger and taller the building can be. 

What are some of the benefits of having a strong core? 

Your back is happy!

  • Most of us would have experienced lower back pain at some point in our lives. If you have not, you are part of the lucky 20% out of the entire population! Whether you have or have not experienced any form of back pain, we should all work to keep our backs as healthy and happy as possible for as long as possible. 

Improvement in posture 

  • Good sustained posture is also beneficial for your back. It reduces the amount of unnecessary load on your spine and can potentially slow down the rate of degeneration on your spine. 

Allows you to do what you want/need to!

  • Think about your hobbies, the sports you enjoy playing, your workout habits, and even daily household chores – most of these activities require a certain amount of core strength or are generated from your core.  

Reduces your risk of falls 

  • Your core is essential in balance and stability. It is one of the main muscles that help you stand on one leg without falling over. As we get older, we start to lose balance, which increases our risk of falling. By keeping your core strong, you can decrease fall risks and keep doing what you love longer! 

There is no disadvantage to having a strong core. If you need help in creating a program or help starting out with basic core exercises, give us a call at 85999811 to book in to see one of our physiotherapists or exercise physiologists today!

When Is Too Much? Subjective Pain Scale

podiatry BOSIC

By Physiotherapist, Paulina Backiel


When is too much? How much can my body handle?

When you go to the physio, you might think, “why on earth are they asking me an endless amount of questions?” If only answering these questions could get you points to win money like in the game of “Who wants to be a Millionaire” – am I right?

Well, the reason that physiotherapists do this is that each individual is different. There may be similar patterns that we find with each injury we see, but there will always be that slight difference in everyone’s journey and recovery.

The human body is amazing, it can heal itself or adapt to anything that life throws at it. But just like us, it can fall into the wrong habits and adapt to improper use of muscles or loading. 

Let’s take running as an example.

Your body will have an idea about the proper mechanics of running which we all learnt as children. The only thing is, if you have been working at a desk job that makes you sit for 8+ hours a day, there could be a possibility that you may not have gone for a run for quite some time. Regardless, you still get up and run and to your surprise, it feels absolutely great (well that was easy). Now you’re getting to the last kilometre of your run, and whilst you’re thinking “I used to run 5km so I should be able to do it now right?”, your calves get super tight and your knee begins to feel a bit niggly.

Sound familiar?

This is a great example of how your body has the capability to keep you upright. However, it does come down to two things:

1. BIOMECHANICS: the mechanism your body is using that is causing the knee pain is not right
2. THRESHOLD: the calf muscles are not used to having that much load put on them.

SUBJECTIVE PAIN SCALE

Below is the pain scale that I introduce to all my patients on how to stay safe whilst exercising.

It is scaled out of 10, where 0 indicates no pain, 1 would be a mild irritation, and 10 being excruciating pain.   
           
0-2 / 10 | SAFE ZONE
You can keep doing the exercise you are doing, the pain would come down to the fact that the exercise is stressing the body.

3-4 / 10 | CAUTION ZONE
3/10 for some is still considered safe but a good indication not to increase the intensity of your exercise.
4/10 is when your body is telling you to decrease intensity of your exercise. Modify it to see if the pain subsides.

5+ / 10 | DANGER/HIGH RISK ZONE
In this zone you are at a high risk of injury if you continue what you are doing. As an example, if this were a runner, I would immediately stop and just walk.

So guys, stay safe and keep exercising 🙂

If you feel like you may have injured yourself or you are in pain, click HERE to book in with one of our practitioners now!

Sports henias: What are they and how can you prevent them?

exercise physiology BOSIC

What is a sports hernia?

A sports hernia is a weakening of the lower abdominals. Essentially, it is a strain or tear of any soft tissue (muscles, tendons, ligaments) in the lower abdominal or groin area due to an imbalance. The most common mechanism of injury is through a rapid change of direction or rotational (twisting) movement.


Sports hernias aren’t so different to the traditional inguinal hernias as they both occur in the same region. However, unlike the common inguinal hernia, a sporting hernia cannot  be felt via a bulge in the lower abdominal area. 


We do not own the rights to this image. Image retrieved from Daily Mail.


What does a sports hernia feel like?

Typically you may feel severe pain during the time of injury, and persistent pain with any twisting or intense abdominal contraction. Whilst not doing any strenuous activity it will not be bothersome. However, during intense activity or movements the pain will re-emerge. If not taken care of, a sporting hernia may evolve into a more common inguinal hernia. 


If you have trouble or experience pain getting out of bed (sit up position) or turning whilst carrying heavy groceries (twisting). There’s an increase in likelihood of a sporting hernia, where further investigation by your health professional might be necessary. Medical imaging may be required, as well.


How do you prevent and manage a hernia?

Unfortunately, there is no specific prevention other than keeping your core strength in balance. Here are some exercises to minimise the risk of this of suffering a sports hernia:

      • Side planks

      • Contralateral lunges

      • Squats

      • ½ kneeling medicine ball press

      • Glute bridges on a bosu board


If you feel you may have a sports hernia or another type of injury, book in to see one of our physios today. Give us a call at 8599 9811. 

Work smarter not harder – the TOP 3 functional exercises

TOP 3 FUNCTIONAL EXERCISES 

Functional exercises are designed to improve your mobility, stability, and agility to perform activities and tasks. There are many functional exercises out there. Now that you are working from home, many of you sit down more than ever. Prior to COVID-19, on average people sit more than 70% of the day, and I suspect this percentage will only increase.

To combat sitting for too long, I have picked my top 3 functional exercises to set a strong foundation for you to smash your fitness and movement goals, but also improve your quality of life. The best part is that it is simple, little to no equipment needed, and not time-consuming.

These three exercises are a breakdown of complex movements designed to be strategically progressed and tailored to your fitness and movement goals. Overall, the aim is to build a strong foundation through core stability, on top of optimising your joint mobility and improving your strength and conditioning. The best part of these functional exercises is that these movements have infinite movement progressions. 

Number 1 – Renegade Rows

Renegade rows are a multi-purpose dynamic movement. They are designed to improve midline/core stability, as well as unilateral (one sided) upper back strength and stability. 

The primary key muscular regions involved in this movement are:

  • Upper back

  • Core 

  • Arms

*Training tip: Keep the core strong to limit the torso from twisting

Number 2 – Crawls

Crawls are a foundational movement. It is a moving plank. It works out your core muscles just like a plank, but since you are moving it incorporates shoulder and hip mobility and stability. 

The primary key muscular regions involved in this movement are:

  • Core

  • Legs

  • Shoulders

*Training tip: Attempt going forwards, sideways, backwards or even faster for aerobic conditioning

Number 3 – Thoracic Bridge

These are perfect for spine hygiene and maintenance of spinal strength. Spending too much time sitting at your work from home office can lead to bad postures, hunched back and shoulders. This movement reverses to strengthen the upper and lower back, engages the glutes and opens up the chest. 

This is a total body movement.

*Training tip: Keep the feet flat on the floor to optimise the stretch.

Functional exercises are designed to improve your mobility, stability, and agility. It starts off as an easy movement sequence. However, it can be strategically progressed to smash your goals. Stay tuned for part 2! 

What is cupping?

BOSIC Specials

Cupping is an alternative treatment primarily designed to decompress the soft tissue. Unlike many forms of manual therapy such as massage, (trigger point massage) where a compressive force is applied. Cupping does the opposite. 

The cups are applied to certain areas of the body to lift up the skin/fascia to stimulate a decompressive force on the tissue and nervous system to reduce muscular tension, neural tension, improve circulation/blood flow circulation, and/or create body awareness to particular muscles or movement patterns.

In contrast to the widely known bruising circular marks you may have seen on popular athletes such as Michael Phelps, we use cupping for a short amount of time. As a result, you often will not get bruised marks. Unfortunately, sometimes people still experience bruising, but the end result of the treatment is the same. 

In this video we are demonstrating on Kira how to unload and decompress the neural tension in her arm. We are cupping in conjunction with a neural glide to improve her range of motion alongside reducing the tingling/numbness she feels down her left 4th and 5th finger. Below, you can see the results before and after Kira’s cupping treatment. The pain and tingling kept her from fully extending her arm. The release created by the cupping now allows her to move her arm to end range without any pain. 

Can’t fake a smile like that!! Kira is very excited about the increased movement in her arm.

Note: this may not always be the same treatment for everyone. It will depend on a case by case analysis. Please do not attempt by yourself unless you have seen a qualified health professional.

Want to learn more about cupping? If you’d like to book in for a virtual physiotherapy appointment, feel free to call us at 8599 9811 or send us an email at hello@bosic.com.au.

5 Benefits of a Total Body Workout

contact us BOSIC

By Physiotherapist, Vanessa Boon

5 benefits of a total body workout

1.Ideal for home workouts 

Especially during this time, most of us will be doing our workouts from home. The good thing about that is that we do not need much equipment at all! You can modify it and make it harder by increasing your repetitions or add weight (dumbbells, water bottles, books) or make it easier by increasing your rest time.

2. Burn more calories 

Simply, a total body workout burns more calories because you work more muscles. You can think about it like doing many compound exercises in a short amount of time! Plus you can tweak some exercises to make them plyometrics (squats → squat jumps) which will really get you heart pumping and burn those calories! 

3. Decreased time commitments 

Split training sessions can take awhile depending on the structure of your program. Not everyone has time for that, but also during quarantine season, not everyone has the set up or access to the weights needed to complete their standard program. If you only have half an hour to spare in a day, a total body workout is perfect for you! 

4. Builds more strength 

You work all the muscle groups in your body or at least all the major muscle groups with a total body workout. A workout that works all your muscles together gives them the endurance and the strength they need to do what you want them to do! Because you do these workouts ideally 3 times or more a week, your muscles are worked more than they would be with regular split training. 

5. Perfect for beginners 

A total body workout is the best way to build total body strength! You can modify your workout to make it as easy or as difficult as you want. You can also focus on specific areas that are weaker than others to make sure no part is lacking in strength. Check out this video to learn three exercises that are effective for a total body workout! 


During this time of isolation it is important to keep moving. There is no better and safer way than total body workouts! We do a free workout on our instagram live (@barangarooclinic) most days of the week or if you would prefer a more specific program tailored to you, book in with us or give us a call at 8599 9811 and let’s start planning!

Can’t get to the gym? Get creative!

By Physiotherapist, Paulina Backiel

DIY: At-home Gym Equipment

Back when I was a full-time international postgraduate student, there was no way I was able to afford rent, transit, uni fees AND manage to pay for a gym membership. So, I got creative and built my own gym!! In this blog, I am going to outline the steps I used, so that you can create your own gym, too.

Materials:

  1. Canned goods and rice (anyone else reminiscing about those 5 star uni dinners?)
  2. Coles/woolies bags, old purses 
  3. Backpack
  4. Staircase or solid/sturdy chair
  5. Sturdy chair or couch (not too soft)
  6. Milk cartons or soft drink/water bottles (500ml, 1L, 2L, 3L)

So how do we make weights/gym equipment using our supplies?

Kettlebells

-use the Cole’s bags or purses/small bags and fill them with heavy items such as canned foods or bags of rice

Exercise example: walking lunges holding heavy bags at side

Weighted vest

-fill backpack with heavy items such as canned foods or rice bags

Exercise example: Weighted squats with backpack on backwards (heavy side on chest, unless you want to do a back squat then on back)

Stairs or box at gym

-staircase or sturdy chair

-can hold 2 milk jugs in either hand to add weight

Exercise example: step ups with or without holding weight

More Dumbbells and Kettlebell ideas

-fill up old milk cartons (3L=3kg, 1L=1kg, etc.)

Exercise example: bicep curls holding 2L full milk carton

Bench

-Couch or solid chair

-again can use weight with either weighted backpack vest you made or holding heavy object

Exercise example: sit to stand from chair or couch (soft couches will be harder so just tap couch with bum)


So there you guys have it!! Heaps of amazing things that you can find at home and create your own gym!! Just remember a can of beans is 400g = 0.4kg, 500ml bottle of water = 0.5kg.

Have fun training!!!