Tips on buying school shoes for children

By Podiatrists Russel Rubin and Trevor Proskewitz

Introduction

Did you buy your kids new school shoes only to have them complain about blisters and squished toes? Are you unsure of what shoes to buy them for the upcoming sports season (hello, soccer!)? Did you buy cheap school shoes online, but are regretting your decision thanks to the shoes’ poor quality and bad fit? A visit to our podiatrists is just what your children’s feet need.

The fact is, children spend over six hours a day in their school shoes – jumping, running, walking, skipping. In addition, many of them engage in sports such as soccer, netball, cricket and athletics. It’s imperative that they wear shoes that fit properly so that their young feet have the chance to grow correctly. Ill-fitting shoes can lead to problems such as ingrown toenails, corns and bunions. When you visit a podiatrist to get your children’s feet measured and fitted, your podiatrist will match your child’s foot type and function with the correct pair of shoes and also look after their overall foot and ankle health.

A Podiatrist will:

  • Measure both of your child’s feet accurately, taking into account the length and width, since very often, the size varies from foot to foot.
  • Recommend shoes that fit the natural shape of your child’s foot.
  • Check to see if your child is flat-footed or has high arches and can recommend customised orthotics to give your child’s foot the support it needs.
  • Look out for any lumps, calluses, growths or rashes.
  • Help if your child suffers from recurrent pain in their feet or legs, or if your child is constantly tripping or falling.
  • Correct gait issues such as walking on tip toes, walking/running in a lopsided manner, etc.

Tips When Buying Shoes for Children:

  • Get your child’s feet measured professionally every single time they buy shoes as their feet are constantly growing and developing.
  • Shoes should not feel tight. The shoe box should have at least 1cm growing room between the end of your child’s longest toe and the top end of the shoe.
  • Don’t be tempted to buy shoes that are 2-3 sizes too large. They will not stay on their feet properly, causing your child to trip and fall.
  • Get your child to wiggle their toes while trying on the new pair – the shoes should have enough room to do this. The toe of the shoe should allow your child’s toes to move freely and not feel cramped.
  • Shoes with laces, buckles or ankle straps give better support and hold the foot firmly in place. Do not buy slip-ons or second-hand shoes.
  • The widest part of the foot should correspond with the widest part of the shoe.
  • Shoes should fit comfortably around the heel.
  • Buy shoes towards the end of the day when your child’s feet are at their largest.
Contact the footinjuryclinic podiatry team to get your children’s feet assessed, measured and fitted with shoes for school and sport before they start the new academic year.

How to choose shoes that fit correctly

By Podiatrists Russel Rubin and Trevor Proskewitz


Introduction

When it comes to shoes, there are often two types of people: those who buy too many pairs and those who avoid shoe-shopping at all costs. But did you know that shoes are not all about looks – the shoes you choose can have a big impact on your foot health. How so?

Whenever you move or walk, your feet carry twice your entire body weight with every step you take. Having correctly fitted shoes will give your feet the cushioning and support they need while feeling comfortable. On the other hand, shoes that don’t fit properly can contribute to injuries such as shin splints and Achilles tendon pain, corns and bunions, ingrown nails, or postural issues and lower back pain.

Our podiatrists have outlined these tips to keep in mind when you shop for new shoes:

Space matters

Always make sure there is 1.5cm of space between your longest toe and the tip of your shoe. Wiggle your toes to make sure there’s enough room for them to move – they should not feel squished. In some cases (e.g. if your shoes are made of leather), it might take awhile for your shoes to stretch out, but overall, your shoes should feel comfortable, even if they are new. 

Test your shoes

Before you start wearing your shoes regularly, test them out on different surfaces to see how they feel when you walk. Wear your new pair of shoes at home for short bursts before you wear them to go out for longer periods.

Shop in the afternoon

Did you know your feet are a little larger at the end of the day than in the morning? Going shoe shopping later on gives your feet enough time to expand naturally and you will find a pair that fits you better. 

Get fitted correctly

Get your feet measured and do this every time you buy new shoes. Feet change with age, often growing larger and wider. If one foot is larger than the other (which is often the case), buy a size that fits the larger foot. If you wear orthotics, make sure to try on new shoes while wearing these inserts. And, yes, we manufacture custom-made orthoses at footinjuryclinic’s in-house laboratory.  

Make sure your feet are supported

Always make sure your shoes are well-fitted and provide the right support for your feet at the ankle and arch. If your shoes feel uncomfortable, or cause any discomfort, make an appointment with our podiatrists before it becomes a serious problem.

Get in touch with our podiatrists who can help you find shoes that suit your foot type and your daily activities. We can also do a biomechanical gait analysis as well as make customised orthoses in our in-house lab. 

Bondi Junction9386 5400
Barangaroo8599 9811
St Ives9440 4600

How to Deadlift Series: Stiff-Leg Deadlift

By Physiotherapist, Paulina Backiel

Introduction

Last but not least in our deadlift series is the stiff-leg deadlift. As you may recall this is a summary from my “Types of Deadlifts” blog, which you can find here


Stiff-Leg Deadlift

Starting position: Similar to RDL position but with knees slightly bent

Movement: Keeping your knees slightly bent, just like an RDL moving the bar down past knees then up. Knees remain fixed throughout the movement.

Muscles targeted: Abs/core, lower back, glutes, hamstring, calves

Performance enhancements: squats and overall leg strength

*Avoid this type of deadlift if you have lower back or leg problems. Refer to my previous blog to find which type of deadlift might be best for you. 


So this deadlift is quite aggressive on the lower back and legs, it requires a lot more core and lower back than Romanian and conventional deadlifts. This is a great advanced deadlift to help with improving your squats and overall leg strength. Just like the Romanian deadlift, in the stiff-leg you start by holding your weight just off the ground before you go into the movement.


Step-by step

Please note: It is advised to get expert help if you have never done these before.

Click here to book a physio appointment to test whether this is the right deadlift for you or to guide you to build up to this exercise.


1. Start by standing upright, holding the weight/bar close to thighs, have a soft bend at knees(not locked straight)

2.Lower the weight/bar hinging at the hips and maintaining the soft bend at the knees. Remember to keep your back straight throughout the entire movement.

3.Once the weight/bar has passed the knees and gotten to mid shin thrust the weight/bar up, keeping it close to your legs. As you thrust make sure you are maintaining the knees at a soft bend and thrusting at the hips, your back must remain straight throughout the whole movement.

Repeat steps 1-3. 


Conclusion

So that is how you stiff leg deadlift. Please make sure you have the correct coordination down before you lift any heavy weight. 

Since this is aggressive on the body please avoid if you have lower back or leg problems.

If you have further questions, you can email me at paulina@bosic.com.au or you can book an appointment by calling 8599 9811. 


Your physio,
Paulina

How to Clean and Dress Your Wounds

Introduction

Our skin is the largest organ in our body and helps protect it from germs. Anything that breaks the skin is a wound because when the skin is broken, there’s a risk of infection. More often than not, wounds happen due to accidents, but – guess what? – even clean surgical incisions are wounds. The deeper, larger, or dirtier a wound is, the more care it needs. Here’s how you look after your wounds. 

Cleaning Your Wound

Follow these steps to clean your wound:

  1. Wash your hands, dry them and put on a new pair of  gloves.
  2. Use a clean, soft washcloth to gently clean your wound with a few tablespoons of salt dissolved in lukewarm water. Your wound should not bleed much when you are cleaning it but a small amount of blood is okay.
  3. Rinse your wound with water. Gently pat it dry with a clean towel – do not rub it.
  4. Check the wound for increased redness, swelling or a bad odour.
  5. Pay attention to the colour and amount of drainage from your wound. Look for drainage that has become darker or thicker.
  6. After cleaning your wound, remove your gloves and put them in a bag with the old dressing and gloves and dispose of this.
  7. Wash your hands thoroughly again.

When it comes to how fast and effectively your wounds heal, the type of dressing you use is crucial. The type of dressing depends on the type of injury, the size, location, and the severity. To make the process of choosing the right wound dressing for the injury, that little bit easier, we have put together the guide below, detailing what each of the seven most commonly used wound dressings should be used for.

Hydrocolloid Dressing

Hydrocolloid can be used on burns, wounds that are emitting liquid, necrotic wounds, pressure ulcers, and venous ulcers. Hydrocolloid dressings create moist conditions which help to heal certain wounds, yet they are impermeable to bacteria, which is what makes them so effective at preventing infections. The flexible material that they are made from makes them comfortable to wear and suitable for even the most sensitive of skin types.

Hydrogel Dressing

Hydrogel can be used for wounds that have little or no leaking, are painful or necrotic wounds, or are pressure ulcers or donor sites. Hydrogel can also be used for second-degree burns and infected wounds. They maximise patient comfort and reduce pain through a cooling gel while helping to heal wounds or burns and fight infection.

Alginate Dressing

Alginate dressings are for wounds that have high amounts of drainage, burns, venous ulcers, packing wounds, and higher state pressure ulcers. These dressings absorb excess liquid and create a gel that helps to heal the wound or burn more quickly. You will need to change these dressings every two days, sometimes more, due to the amount of liquid that they absorb. These should only be used for wet wounds with high liquid drainage or else they can hinder healing by drying out wounds too quickly.

Collagen Dressing

They can be used for chronic wounds or stalled wounds, pressure sores, transplant sites, surgical wounds, ulcers, burns, or injuries with a large surface area. These dressings act as a scaffolding for new cells to grow and can be highly effective when it comes to healing. Collagen dressings help remove dead tissue, aiding the growth of new blood vessels and helping to bring the wound edges together, effectively speeding up healing.

Foam Dressing

For wounds of varying degrees of severity as well as for injuries that exhibit odours, foam dressings can work very well as they absorb exudates from the wound’s surface.  These dressings allow water vapour to enter which promotes faster healing, but prevent bacteria from entering the affected area. 

Transparent Dressing

These dressings cover the wound with a clear film, making it useful for medical professionals /carers to monitor wound healing. Medics can identify potential complications and spot infections earlier. These kinds of dressings are often used on surgical incision sites, on burns and ulcers, and on IV sites. These dressings are breathable but impermeable to bacteria, helping to keep the wound clean and dry; they are also flexible, which makes them comfortable to wear.

Cloth Dressing

Cloth dressings are the most commonly used dressings for open wounds,  areas of broken skin and minor injuries such as grazes and cuts. They  come in all shapes and sizes, from small coverings for fingers to larger ones for wounds. 

If you have a wound that needs urgent attention, VISIT our podiatrists at barangaroo who will be able to clean and dress it appropriately.

How Sports Doctors and Physiotherapists work together

By Physiotherapist, Vanessa Boon

Dr Masi is an avid runner, skier, mother-of-2 and wife. She is a trained sports, exercise and lifestyle physician who has a keen interest in helping women of all ages live a healthy and active lifestyle.


What made you choose to combine lifestyle coaching after specialising in sports and exercise? 


I want to help women through all ages of life as it is not just them coming in with their injuries but also helping them be healthy and stay healthy and active without actually presenting to me with a problem. Basically, to give a holistic approach to females. 


With your interest in helping women, how do you help women with certain women’s health issues surrounding pregnancy?


Firstly, I help women recognise how important they are, as a woman, not just as a mother. To remind them to look after themselves both physically (to support them with the challenges that come along with raising a baby) and mentally.


How do you think physiotherapy ties in with how you practice?


Well, I am pretty good at seeing the whole picture and sometimes there are things that the women do not see themselves, and so I work together with a physiotherapist as they are the ones who help the women get to know their bodies, understand their bodies and how to get their bodies to do what they want them to do. Also, I think that physios have that magic touch with is always needed. 


What are the top 3 questions your patients ask?


Well every patient is different and it depends on whether they present with a sports, pregnancy or lifestyle related issues. 


How can I get better?

When will I get better?

What can someone else do to help me?


What are your answers to those questions?


Well, it depends on how long they have had the injury for and how much time and effort they put into doing their exercises recommended by me or by their physiotherapist. The more they are able to do that regularly, the sooner they will get better. Some things will naturally take longer depending on what the issue is but the fact is when they get involved and do more for themselves, that is when that process is going to be much quicker.


As a mother what is something your wished you knew pre, during and post pregnancy 


Before my pregnancy, I wish I knew that I wasn’t special. I thought I was, and I have always been a runner and I thought I was going to run until my last few weeks and have a natural birth; like an amazon woman. Well, I wish I knew it was not going to go to plan and I was not able to keep up with my running because I had some complications. I also wish I knew that Pilates was pretty important to do because I would have done it more diligently. 


During pregnancy, it is essentially the same thing. I wish I knew that it was not easy carrying a baby/having someone else on board. 


Post pregnancy, I wish I had known to be more diligent with my Pilates cause I would have been more aware of my body and attended to my diastasis recti (which I still have) a lot sooner. 


In regards to Pilates or a structured Pilates program, why would you recommend that to others?


Well because Pilates really puts you in touch with your own body. I have a runner’s background, I knew about how to use and move your big leg muscles and how to feel good that way. But I was not really in touch with my core, abdominal and back strength. That would have been really key in helping me address my diastasis and have better posture moving forwards to avoid little niggles of back pain that will come and go. 


Lastly, what is something you like women reading this to know? 


I want women to be aware of the fact that they are the queens of their own bodies. There is a lot that we can do to get ourselves better while others can advise and guide us along the way. When we put in the work, we pay attention to our bodies and listen to our intuition, that is what gets us on the road to recovery. 


Vanessa is the go-to physio at Barangaroo Physio. If you would like to read about how and why you should keep your core strong, click here. If you would like to learn how to keep your core and back strong, click here. If you have any questions or want to know if we can help, give us a call at 8599 9811 or book in here.

Step by Step Series: Romanian Deadlift

Introduction

So now that you all know how to do a conventional deadlift, it’s time for the Romanian Deadlift!


As we recall here is a bit of introduction information from my last blog:

Romanian Deadlift (RDL)

Starting position: Standing, bar/weight begins in air 

Movement: Isolated strength; Bar is lowered just under knees and raised up again thrusting hips forward and tightening glutes.

Muscles targeted: Glutes glutes, hamstrings, forearm flexors

Performance enhancements: increase hip mobility, glute and hamstring strength


So, in summary, these deadlifts are great if you want to workout the glutes and hamstrings more than in your conventional deadlifts.


These are also safest for those with lower back pain if done correctly. I would advise if you do have a bad back to consult with your physio or health professional before you attempt these. If you feel that you need a physiotherapy appointment before safely attempting, book in HERE


Step by Step Breakdown:

1.Start by holding the weight at mid shin, hinging at your hips and slightly at your knees(your bottom is not as low as in a conventional DL)

2.Slide the weight along your shins slowly extending your knees

3.Once you get to your knees, slide the weight along your thighs, bringing your hips forward(extending your hips

4.for the finish thrust into the bar tightening your glutes. Make sure that through the entire movement you are placing weight into the heels, driving them into the ground and you lift.

5.Now lower the bar going through the movements backwards 3-1


Now you give it a go!


Remember to use a lighter weight and practice the technique before upgrading in weight. To learn proper technique and figure out which deadlift is right for you, book in for an appointment with me HERE.


Your physio, 

Paulina

Why is foot fitness important?

By Podiatrists Russel Rubin and Trevor Proskewitz

Foot Fitness and Why It’s Important

  • Want to wake up bright and happy each morning, but your plantar fasciitis makes getting out of bed painful?
  • Want to hit the gym, but your achilles tendonitis is flaring up?
  • Want to take your dog out for a walk, but your bunions are too painful?
  • Want to take the stairs instead of the lift, but your arthritis makes it impossible?
  • Want to chase after your kids in the park, but you’re suffering from shin splints?

If your feet are not functioning at their optimal best, it adversely affects your physical health of your entire body since you use your feet in just about every activity you do – standing, walking, running. They support you, keep you balanced and take you everywhere you want to go. They are the foundation of your entire body but you probably don’t give them a second thought – until you’ve developed a foot problem. 

Your foot structure

Each foot has 33 joints, 26 bones and more than 100 muscles, tendons, and ligaments encased by thick connective tissue called fascia. Since human beings evolved as a species that stands upright, the feet are the body’s foundations. 

Foot pain can erode our overall health and wellbeing. Any imbalance in your feet will impact our body’s alignment. Flat arches, bunions, plantar fasciitis and arthritis are just a few common complaints. As we age, these conditions can have a debilitating effect on our quality of life. The fact is, foot complaints are never isolated – they can cause, or be caused by, issues elsewhere in your body. Once foot pain sets in, it can limit mobility and contribute to a sedentary lifestyle, which is associated with many chronic illnesses.

The cycle is vicious but preventable. By focusing on improving the strength and mobility of your feet, you can reclaim your health, improve how the rest of your body feels and functions and enhance your quality of life.

Pay attention to your feet

Do you feel tingling and numbness at night? It could mean you have a nutritional deficiency or that your blood sugar levels need to be checked. Fungal infections could mean that your digestive system or immune system is under stress. 

Your footwear

Women who wear high heels put stress on the foot and ankle which can result in bunions, hammertoes, neuromas and plantar fasciitis. Children who wear shoes that don’t fit correctly can be subject to pain. This is exacerbated if they have flat feet, are pigeon-toed or have Sever’s disease.

Strengthen your feet

Start your journey to fitter feet by practicing regular strength and mobility exercises that target your feet, ankles, hips, and core. Strength training can keep your feet limber and improve mobility. Stretching throughout the day and regular strength training will help with everyday endurance, while wearing supportive footwear can also make a difference.

If you have pain in your feet which is affecting your daily life, book online here.

How do I do a conventional deadlift?

By Physiotherapist, Paulina Backiel

Step by Step Series : Conventional Deadlift


As per my last blog, we learnt the different types of double legged deadlifts that could be done: conventional, Romanian and stiff-leg deadlifts. Today, I’m going to go through the step-by-step of how to do a conventional/traditional deadlift.


As we recall here is a bit of introduction information from my last blog.


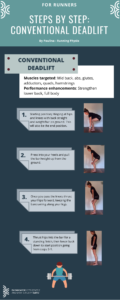
Traditional/Conventional Deadlift (DL)

Starting position: In squat position with weight on ground

Movement: Pulling strength; Bar is pulled up to hips tensing the glutes, then lowered back down to ground in squat position.

Muscles targeted: Mid back, abs, glutes, adductors, quads, hamstrings 

Performance enhancements: Strengthen lower back, full body


**Tip – start with a light weight, practice getting the right form and then increase weight

 
Step-by-step Breakdown

1. Start by standing hip-width apart with the bar or free weights in front of you on the ground

2. Bring your chest out (I like to say make your chest proud) and sit into your hips, into a partial squat position.

3. Reach down to the bar/weights, hinging at your knees and hips. Make sure your knees are above your ankles and that you’re hinging at your hips, not your lower back.

4. Press into your heels and pull the bar/weight up from the ground as you thrust your hips forward into a standing position. Make sure you are placing the bar as close to your legs as possible, I always tell my patients that it should feel like you are “shaving your legs” with the bar. Just watch out not to hit your knees!

5. Lower the bar back to starting position by putting your weight into your heels as you drop your hips back into a squat position, hinging at the knees and hips.


Now you give it a go!!


Check out the step by step below:

Keep your children injury-free during the holidays

BOSIC about us
 

The school holidays are on and sporting activities are on hold. How do you stop your kids from staying indoors, glued to their devices all day? Keeping active is vital for our children’s development while they grow. It helps them stay physically and mentally fit as well as develop healthy bones and joints. So, go ahead and get them to sign up for a holiday camp or a sports team, but keep these tips in mind to ensure that their feet are looked after.

Wear the right shoes

If your child is into different sports, it’s important for them to correct shoes to suit that particular sport. If not, it can lead to foot injuries due to their footwear wearing off and not providing the right support for their feet.

Try different activities

Engaging into the same physical activity day after day can put your child at greater risk of developing a repetitive stress injury. The growth plates in children’s bones do not mature up until the age of 15. If too much pressure is constantly applied without rest, these growth plates can become inflamed and become more susceptible to injury. To avoid this, encourage your child to mix it up: if they’re into intense physical sport like rugby, AFL or distance running, alternate this with activities that are more focused around flexibility like yoga, gymnastics, or pilates.

Be aware of foot injuries

Your children might remain unsupervised during the school holidays while you’re busy working and this might lead to injury while playing sport. If this happens, don’t stress. Get a doctor or podiatrist to determine how serious it is and get a treatment plan. Here are some common injuries that could occur:

Ankle Sprains

Sprains can result from running, or any intense team sport or physical activity. A sprained ankle involves a swelling around it and may take a while to heal. Treatment includes the Rest, Ice, Compression, Elevation (RICE) strategy and ankle exercises. With rest and proper treatment, most ankle sprains heal within 4 to 6 weeks.

Fractures

Fractures are more serious than sprains and are more common in children because their bones are growing and not yet fully developed, making them more fragile than adult bones. Fractures usually occur after a fall and results in pain and/or swelling around the injured area. A podiatrist can always help assess the seriousness of the fracture.

Sever’s Disease

It’s a common heel injury in children in which the growth plate in the lower back of the heel, where the Achilles tendon attaches, becomes inflamed and causes pain. Children can get Sever’s Disease if too much pressure is applied on the heel and there is little foot support to counteract that.

We’re here to help your children stay active

An active kid is a healthy kid. Don’t let the worry of injury keep your children from going outdoors and engaging in sport. If they do get injured, our podiatrists are here to assess the situation and treat them. Call any of our clinics to book an appointment these school holidays and let our podiatrists take care of your children’s foot health.

Bondi Junction9386 5400
Barangaroo8599 9811
St Ives9440 4600

Types of Deadlifts

BOSIC about us

By Physiotherapist, Paulina Backiel


Overview

A lot of you may know of the most popular exercise for your hamstrings, the DEADLIFT. However did you know that there are different types of deadlifts that target different muscles in the body? The key differences are starting position and movement, allowing the exercise to focus on different muscles.

If you were once like me you probably avoided the exercise because it can be very challenging on the back. But, what if I told you there was a deadlift that is a bit easier on the back?

Types of Deadlifts

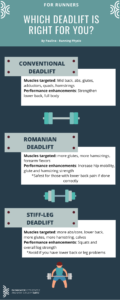
1. Traditional/Conventional Deadlift (DL)

Starting position: In squat position with weight on ground

Movement: Pulling strength; Bar is pulled up to hips tensing the glutes, then lowered back down to ground in squat position

Muscles targeted: Mid back, abs, glutes, adductors, quads, hamstrings 

Performance enhancements: Strengthen lower back, full body


2. Romanian Deadlift (RDL)

Starting position: Standing, bar/weight begins in air 

Movement: Isolated strength; Bar is lowered just under knees and raised up again thrusting hips forward and tightening glutes

Muscles targeted: more glutes, more hamstrings, forearm flexors

Performance enhancements: Increase hip mobility, glute and hamstring strength

Safest for those with lower back pain if done correctly.


3. Stiff-Leg Deadlift

Starting position: Similar to RDL position but with knees slightly bent

Movement: Keeping your knees slightly bent, just like an RDL moving the bar down past knees then up. Knees remain fixed throughout the movement.

Muscles targeted: more abs/core, lower back, more glutes, more hamstring, calves

Performance enhancements: Squats and overall leg strength

*Avoid if you have lower back or leg problems*


Don’t forget to book in to see a physio here if you are experiencing pain or need extra help nailing your form!