Save your knees and increase your cadence when you run

exercise physiology BOSIC

By Physiotherapist, Paulina Backiel


What is cadence?

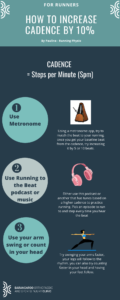
Cadence is the rate at how many steps you take per minute.

For example, let’s say in 1 minute you take 65 steps with your right foot and 70 with your left foot. This equals 135 steps per minute (spm).


Cadence = Steps per Minute (spm)


What is the cadence I should be running at? Is it 180?


You may have heard about the 180spm cadence that everyone talks about, however, this is not true for everyone. The number came about when a running coach by the name of Jack Daniels analyzed professional runners in the 1984 olympics and found that the average cadence between all of them was 180spm. This does not mean 180spm is bad, it just means that it is not going to work for everyone. We all have different leg lengths, therefore, we will have different cadence when we run.


For example a person with longer legs(longer levers), therefore it would be hard for that person to slow their legs before they touch the ground than a shorter person(short levers). So what you find in common is that taller people will have a slightly lower or equal to 180 cadence and shorter people will generally have 180 or higher cadence.


How can you save your knees using cadence?

Most people when they run actually have a very low cadence. This is because we run to music that is on the radio and that is commonly played at 120 beats per minute, so the body ends up copying the rhythm it hears.

Evidence and my own running experience shows that just by increasing your cadence by 10% can improve your running technique and decrease knee pain. These improvements are also shown to last 3 months after the change in cadence. Can you imagine, it can decrease load on your knee by 20%, that is massive! It also has benefits such as decreasing  the load on your hips and more.


Conclusion


Everyone’s cadence is going to vary, however, it will hover around 180spm. By just increasing your cadence by 10% you can save your knees and improve your overall running technique.


Want to improve your running further? Be sure to book in for my Run Faster and Smarter program HERE.


Your physio, 

Paulina


Resources

1.Bramah C, Preece SJ, Gill N, Herrington L. A 10% Increase in Step Rate Improves Running Kinematics and Clinical Outcomes in Runners With Patellofemoral Pain at 4 Weeks and 3 Months. The American journal of sports medicine. 2019 Dec;47(14):3406-13.

How can calisthenics help a scapula injury?

BOSIC about us

By Calisthenics Coach, Nathan Leith (Maximum Potential Calisthenics)


Have you ever suffered from a chronic injury that’s held you back from consistently progressing your training?

Perhaps you’ve even felt a pain in a location that you have never injured before.


Injuries come in all shapes and sizes, sometimes the pain is quite sharp and intense and other times it may be a very dull pain. Major problems can arise in many cases when the actual site of pain is not even remotely close to the initial point of impact or injury location.


For example… Let’s say that you’re a tennis player who always makes wide arching swings in accordance with your playing style. If you were to injure your foot badly you will instinctively place less pressure through that foot and therefore compensate with your other leg. As the years go by you may maintain this habit which will cause your torso to twist causing some mild scoliosis in your spine. This stance may then cause a dip in one of your shoulders (you see where I’m going with this yet?) which as you continue to play tennis can cause your wide arching swings to place extra tension on your shoulder joint and scapula.

From this hypothetical example we can see where the knowledge of a sports injury professional really comes in handy; often, in order to get to the root of a problem, we first must look at the big picture and then armed with more knowledge, diagnose the scapula injury from a holistic standpoint.


The ‘scapula’ is the scientific name given to the shoulder blade which is actually the two large triangular shaped bones that you will find in your upper back. Surrounding this bone is a complex web of muscles that act upon the ball and socket joint that is your shoulder which keeps you moving fluidly within that joint.


The scapula is an area of the body often mired in injuries for people from just about any walk of life. From people who are just going about their daily activities like reaching for a jar from the high shelf in your kitchen… to an athlete who stretches and trains on a daily basis.


The good news is that these injuries are preventable. 


If you have or if you haven’t suffered from scapula injuries the time to begin working on strengthening them up is NOW!


If you have an injury you’re not sure about and never taken the time to have it looked at by a professional I highly recommend you have someone like Barangaroo Orthopaedic & Sports Injury Clinic give you a once over.

If you need to see a physiotherapist for an existing injury, book HERE.


Personally? Well, in the past, I have injured both of my rotator cuffs, one while wakeboarding and the other lifting weights in the gym when I was in a foul mood. The transition from being a bodybuilder who never really stretched at all to a calisthenics coach that loves running and joining in on mobility classes… I’ve performed a full 180 on my approach to training in this regard!

 In our 1on1 PT and small group calisthenics strength and hypertrophy classes we focus on scapular strengthening methods and ALWAYS warm up the body before the training begins. Come enjoy a FREE week on us 🙂

Visit the Maximum Potential Calisthenics website HERE to book now!


~Nathan Leith

Tips for a healthier spine while WFH

FAQs information BOSIC

By Physiotherapist, Vanessa Boon


While working at the office has its challenges, Working from Home (WFH) does not come without challenges either. We have found that most of us do not have a proper desk setup, we do not get out of the house as much and our step count is pretty poor. While this is stressful for our mental health, it also puts a lot of stress on your physical structures such as your spine. Here are our tips on how to reduce the stress on your back and reduce your risk of an injury!


1) Move! 

As difficult as it is to find time to move throughout the day, especially now that we are all working from home, we need to make time to do it. A few easy ways to add in movement in your day would be to: 

  • Stand up every 30 minutes
  • Walk and talk (instead of sitting down for calls)
  • Add an extra few minutes onto your lunch break and go for a walk outside 
  • Do a few squats/lunges/pushups/planks between meetings 

2) Try to create the optimal screen height

Though we may not be able to get it 100% perfect, we can try to make smart and realistic changes. Make sure the top of your computer screen is at eye level, this can be done by putting thick sturdy books under your monitor to elevate it. If you use a laptop, it makes it a little more difficult, but you can use a seperate/bluetooth keyboard. Try

3) “Ergonomic Chair”

Quite a few of us are lucky enough to have ergonomic chairs at work but not at home. These relatively expensive chairs were designed to support the natural curves of your spine and allow for maximal comfort. Most of us do not have these chairs at home but with a simple trick, we can try to mimic the support. Firstly, sit all the way in, roll a small towel, place it behind your lower back and lean on the back rest. Give that a try and see how it feels! 


4) Desk stretches 

We have filmed a series of stretches that you can perform at your desk: link video here. Though we would prefer if you could get up and move around, we also understand that not everyone has the time to. These stretches we created for maximal time efficiency as well as stretches the muscles that get the tightest while we are hunched over working. Do each 2 sets of 30 seconds. 

 
If you have any question or would like to find out more, give us a call at 8599 9811 or book in here to talk to one of our physiotherapists and let’s keep our spines happy and healthy!

Why should I strengthen my hamstrings for running?

BOSIC sports medicine

By Physiotherapist, Paulina Backiel


Where are our hamstrings located?

The muscles that are most commonly called “the back of our thighs” are actually our hamstrings. They are 3 really strong muscles that help us walk, run, and move with ease throughout the day. 


What do they do?

Their main action is to extend the leg behind our hip and bend the knee. However, in running, they are extremely important for absorbing the energy we create and controlling our limbs just before we plant our foot back down on the ground. 


The muscle that gets left behind.. literally!

Usually when running, the front part of your thighs, your quads, start to overpower your hamstrings. This can lead to an imbalance which could potentially change the biomechanics of your running, resulting in a higher risk of injury. We have a lot of muscles in our lower limbs for a reason, these muscles have to work together to propel us forward, especially in running. If one of these muscles overpowers the other, the weaker muscle has a hard time catching up. When this happens, our running no longer becomes a smooth pattern but disorganized. This is when injuries occur.


How loud are you when you run?

When the hamstring is supposed to slow down the leg before it touches the ground but it can’t, that results in the runner hitting the ground too hard with their foot. This will increase the force going into the ground (because it was not absorbed by the hamstring) and then that force comes back at you more than double as much. The faster we go, the more energy our hamstring needs to absorb in order to slow down our foot before it finally reaches the ground. 


Other injuries due to weak hamstrings

Another biomechanical issue we see is overstriding. This is when the hamstring gets overpowered and the knee does not bend fast enough before placing the foot on the ground. This is where injuries such as shin splints and stress fractures occur.


So are you actually training your hamstrings enough? If not, here are some exercises to try:


  • Good Mornings
  • Romanian Deadlift
          •        Progression: Single Leg Romanian Deadlift

Double Leg Hamstring Bridges

      •        Progression: Single Leg Hamstring Bridges


Don’t forget to book in for an appointment with a physiotherapist at Barangaroo Physio. I am certified to give running assessments and would be happy to get you started on a strength program so that you can avoid injury and become a stronger runner. 


Your physio,

Paulina


Sources:

Schache AG1, Dorn TW, Williams GP, Brown NA, Pandy MG.Lower-limb muscular strategies for increasing running speed.J Orthop Sports Phys Ther. 2014 Oct;44(10):813-24. doi: 10.2519/jospt.2014.5433. Epub 2014 Aug 7.

Top 3 Thoracic Mobility Stretches

BOSIC Specials

By Physiotherapist, Vanessa Boon

Our thoracic spine, which is the midsection of our back, is responsible for most of our movement in our midsections. Having good thoracic mobility is key for good posture, overhead movements, and many other sports. Long hours of work and poor posture can lead to increased stiffness =  poor movement  = injury, discomfort, and possibly poorer sporting performance. Here are my top 4 mobility exercises to keep your thoracic mobility in check! 

1. Segmental thoracic extension 

How to: 

  • Roll up a towel and place it on the floor across the area you will lie on. 
  • Lie on your back with the towel positioned underneath and across your upper back. 
  • Relax in this position, allowing your arms to drop out to the side and your chest to open up, stretching your upper back over the towel. 
  • Remain here for 30 seconds
  • Move the towel down to the next segment of your upper back, and repeat.
  • Note: when this stretch becomes easy with a rolled up towel, you can progress to using a foam roller. 

2. Book Openers

How to: 

  • Lay on your side with the bottom leg straight and the top leg bent.
  • Reach your arms out in front of you, with your hands together. 
  • Rotate the upper arm upwards and outwards from your trunk. 
  • Try to rotate as far as you can, without forcing the shoulder. 
  • Hold this position for 2×30 seconds on each side.

3. Thread the Needle

How to: 

  • Start in 4 point kneeling
  • Your hands should be under your shoulders and your hips over your knees. 
  • Take one hand off the floor and reach in and through between your other hand and leg on that side. 
  • Allow your shoulder and head to follow, moving down towards the floor as your hand reaches through. 
  • Allow your back to twist, you should feel a stretch down your side, your shoulder blade and neck. 
  • Hold this position for 2×30 seconds and repeat on the other side. 

These are my top 3 thoracic mobility stretches. If you would like a mobility program tailored to you, give us a call at 8599 9811 or book in here.

Show your sides some love! All about obliques

The Importance of Obliques

Many of you know but our muscles are designed to be challenged. Our obliques (side core muscles) are built to resist spinal and pelvic rotation. Due to this reason, it is pivotal for athletes to challenge our obliques either under load, tension or velocity (speed). For field athletes, we use the ground to push off and generate power and speed. This transfers energy up the kinetic chain (our body) from the lower extremities to our torso and upper body. However, if we lose stability in our torso/trunk there will be an energy leakage in the kinetic chain, our body. 

Our core muscles, including the oblique muscles stabilise the midsection of the body, allowing our upper and lower extremity muscles to move (lengthen), in turn generate force/power. For field athletes we can increase our cadence (amount of steps per minute). However, we change many other factors to improve your speed, running time or agility. By working on our core strength, we will be better able to keep upright, reduce knee valgus (knees caving inwards) and ultimately increase speed whilst mitigating the risk of injury. 

No matter if we are attempting to change direction, sprint towards the ball, or prepare for a jump, improving core stability and running/jumping techniques is mandatory to optimising our performance. Incorporating various core exercises will help achieve personal bests and a deciding factor in games. 

All these exercises have several benefits other than just working out the core. These are great for unilateral (one-sided) abdominal work. Working on one side of the body can help address any muscular imbalances in your muscles, joints and tendons. It’s the same as any other exercise, with lunges primarily working on one side as opposed to a standard squat. All three can be used as movement preparation/warm-up drills, anti-rotation core stability work, and sports specific movement sequencing.


1. Side planks (progression: hip dip, rotation)

2. Woodchoppers (progression: tall kneeling,½ kneeling)

3. Pallof Press (progression: tall kneeling,½ kneeling)

4. KB walks unilateral (progression lunges)

5. Bird dog +/- band (progression: standing

6. Med ball rotation toss (progression: plyos)

7. Oblique side crunch (progression: standing w/ wt)

Need more exercise ideas? Follow along with Barangaroo Physio on Instagram and Facebook (@barangarooclinic)! We post TONS of workout tips and we host live workouts 5 days a week. 


Why is Single leg sit to stand an important exercise for runners?

By Physiotherapist, Paulina Backiel


Single Leg Sit-to-Stand for Runners


You may have heard from one of your physios of the exercise called the “sit to stand.”


It’s a very standard exercise where you are told to stand up from a regular height chair properly then asked to sit back down – slow and controlled – without flopping back into the chair. Then the physio starts progressing the exercise until they tell you to do the same but on a single leg.


So why are they telling you to get up off a chair with one leg and sit back down? How is this practical? When are you ever going to have to get up then sit back down using one leg? They keep talking about this magic 22 number (read on to find out what this is!) but what does it mean?


Here is why:


  • Running Biomechanics – 

When we run we are always on one leg, never two. So, if you cannot withstand holding your own weight doing a single leg sit to stand how are you supposed to handle 1km of it? Sure, it requires a bit more muscle strength to get out of a chair since you have to get into a lower squat than while running, but this will just make you a more resilient runner.


  • Injury Prevention –  

If you are running with your knee caving in or your hip out or dipping this can lead to injury in the future. By doing a simple single leg sit to stand test until fatigue, we can see where muscles start to fatigue and misalignment starts to happen.


  • Healthy Knees – 

An article by Culvenor et. al (2016) shows that those after a common knee surgery called “Anterior Cruciate Ligament Reconstruction” showed better knee health 3 years after the surgery. These subjects were able to do 22+ single leg sit to stands, while subjects who could not perform at least 22 reps scored significantly less for overall knee health. (1)  


So who wants to try some single leg sit to stands? Here are some progressions from beginner to expert:


 1. STS (double legs) no hands from chair (48cm height)

2. Staggered leg STS. In this exercise, your back leg is the one with all the weight while your front is only used for balance (10-20% weight)

3. Staggered leg STS with leg on block. The leg that is on the block is the one in front, and now you have to challenge yourself by only putting 0-5% weight through that leg and using your back one.

4. Single leg STS. With one leg up, get up off the chair and back down slowly on a single leg. Watch your knees so they don’t cave in or go past your toes!!


Check out this video to watch Paulina perform the progressions in real time:


Now you have a try!! Click here for a printable guide of the exercises. If you are experiencing pain, or need assistance from a physio, be sure to call us at 8599 9811 or book in for an appointment HERE.


References:
  1. Culvenor AG, Collins NJ, Guermazi A, Cook JL, Vicenzino B, Whitehead TS, Morris HG, Crossley KM. Early patellofemoral osteoarthritis features one year after anterior cruciate ligament reconstruction: symptoms and quality of life at three years. Arthritis care & research. 2016 Jun;68(6):784-92.

Warmup for runners – 8 dynamic stretches

exercise physiology BOSIC

By Physiotherapist, Paulina Backiel

Why do we warm-up?

Remember when you wake up in the morning, getting out of bed is always so hard because your body feels stiff. So you raise your arms to the sky for a stretch, and you immediately feel like your body can move more.

Running is a very large movement for our bodies and requires many muscles to stimulate and work with each other. Warm-ups are exercises created to wake up the muscles you are trying to target, initiating stimulation by movement. This will increase blood flow and oxygen to the muscle allowing it to “wake up.”


What kind of warm-up do we do? What kinds of stretches are good?

You will often hear “dynamic stretches” for warm-ups. This means that you do not hold them for a long time like “static stretches.” In a dynamic stretch, as mentioned above, you just want to stimulate the muscle, not lengthen the muscle like you would for a static stretch. Below are examples of a dynamic vs. static stretch:

Dynamic = For example, when you do a quad stretch pulse, you do not hold it in a stretched position but move your foot towards and away from your bum.

Static = For example, when you do a regular quad stretch you try to bring your foot as close as you can to your bum and hold it there.

Here are 8 dynamic stretches for warm-up:

Lateral leg swings

Front and back leg swings

High knees with calf raise

Quad stretch pulse

Glute stretch pulse

Pulse lunge

Pulse squat

Hamstring and calf stretch – toe swipes

Watch the video below for a demonstration!


Happy running!!

Your Running Physio,
Paulina


How to deepen your squat – Part 2

BOSIC sports medicine

How to Deepen Your Squat – Increasing Ankle Mobility 

For those following here is Part 2 of the ankle series to improve your squat depth. If you’re like me and find it hard to perform deep squats or go as low as you would like, whether it be for Olympic lifting, powerlifting, running and cutting, or to jump higher, then I have a few tips for you to implement in your program. My second round of ankle tips revolve around strength and mobility. 

Firstly, let’s address the unknown and neglected muscle, the tibialis anterior. 

Over the years I have found the tibialis anterior muscle important in improving ankle dorsiflexion. The main function of this muscle is to dorsiflex and stabilise the foot and ankle. When this muscle contracts, it pulls the foot upwards to the shin. If you don’t have enough of this movement, generally you either begin to lift the heels off the ground as you deepen the squat or lose stability in the foot and ankle. This changes the tracking of the knees, generally leading to knee valgus (knees caving in) and reduces the hip/glute power to push out and down into the platform. Effectively, losing your squat form or leading to issue up the kinetic chain (mainly knee and hip injuries). 

Here is an exercise to help strengthen this muscle and allow it to do its job. 

  • STANDING HIP FLEXION AND TIB ANTERIOR STRENGTHENING


  • THERABAND ANKLE INVERSION STRENGTHENING

Another muscle often forgotten is the tibialis posterior. Yes, it sounds very similar to the first muscle I named, tibialis anterior. Except this muscle sits further back in relation to the foot and ankle, hence posterior. This muscle is designed to keep your foot strong and stable during the squatting movement. 

The function of the tibialis posterior during a squat is to maintain an arch on the inside of the foot. The moment you lose the arch, you lose foot and ankle stability and squat technique. Once again this muscle can contribute to injuries up or down the kinetic chain. A loss of stability in the foot may lead to knees caving in the lower half of the squat placing further stress on the hips, glutes and low back.


Today’s keynote: Strong and stable foundation! 


If that has helped you and your squats, then stay tuned for more blogs and exercises to improve your squat performance. If you have questions, give us a call at 8599 9811, or book in for an appointment here.

Top 3 Glute Max Exercises

By Physiotherapist, Vanessa Boon

Top 3 Exercises for the Gluteus Maximus


4-point kneeling hip extension


This exercise targets your glutes, core (including your lower back), hamstrings and shoulders. 


How to: 

  1. Start in 4-point kneeling with your hands under your shoulders and knees under your hips. 
  2. Keep your back neutral and engage your core. 
  3. Lift one leg up behind you, keep your knee at 90 degrees. 
  4. Think about pushing the heel of your elevated foot up towards the ceiling while keeping your hips stable.
  5. Control the movement as you bring your knee back down towards the floor and repeat.


Single leg hip hinge 


This exercise targets your glutes but also trains your lower limb stability as well as balance. 


How to: 

  1. Start with your hands across your chest or holding a weight, feet hip width apart.
  2. Bend one leg to 90 degrees and place your foot on the wall behind you. 
  3. Engage your core and glutes as you hinge forward at the waist and push your buttock towards the wall behind you. 
  4. Make sure your front knee is directly above your ankle, and pointing forwards and repeat.


Glute bridge pulses 


This exercise targets your glutes but also your core (including your lower back), your hamstrings and quadriceps. 


How to: 

  1. Start laying down on your back, keeping it neutral. 
  2. Feet should be hip width apart, engage your glutes and core. 
  3. Lift your hips up into the bridge position until you have a straight line from your shoulders to your knees. 
  4. Control the movement as you lower your hips back down without your buttocks touching the ground and repeat.


These are my top 3 picks! But remember that what works best for one person may not for others. If you would like a more specific program or exercises tailored to your sport, give us a call at 8599 9811 or book in here to talk to one of our physiotherapists today!